Ever wondered how that 120% spike in cocoa prices translates to the actual cost of your chocolate chip cookies?
If you’re struggling to quantify the real impact of commodity price movements on your finished products, you’re not alone. Most procurement managers find themselves caught between ingredient price volatility and the need to provide accurate cost projections to their teams.
That’s where Vesper’s Cost Models come in.
This powerful feature transforms individual commodity prices into complete product cost breakdowns, giving you the clarity you need for confident decision-making.
In this guide, I’ll walk you through exactly how to build your first cost model using a bread recipe as our example.
What Are Cost Models?
Cost models are customizable compound benchmarks that combine:
- Raw ingredient costs from Vesper’s extensive price database
- Non-ingredient manufacturing costs like labor, energy, and overhead
- Real-time price tracking to monitor how your product costs evolve over time
Think of it as your crystal ball for product pricing, but one backed by real data instead of guesswork.
Adding cost models to your dashboard
Before we dive into building, let’s get Cost Models added to your Vesper dashboard.
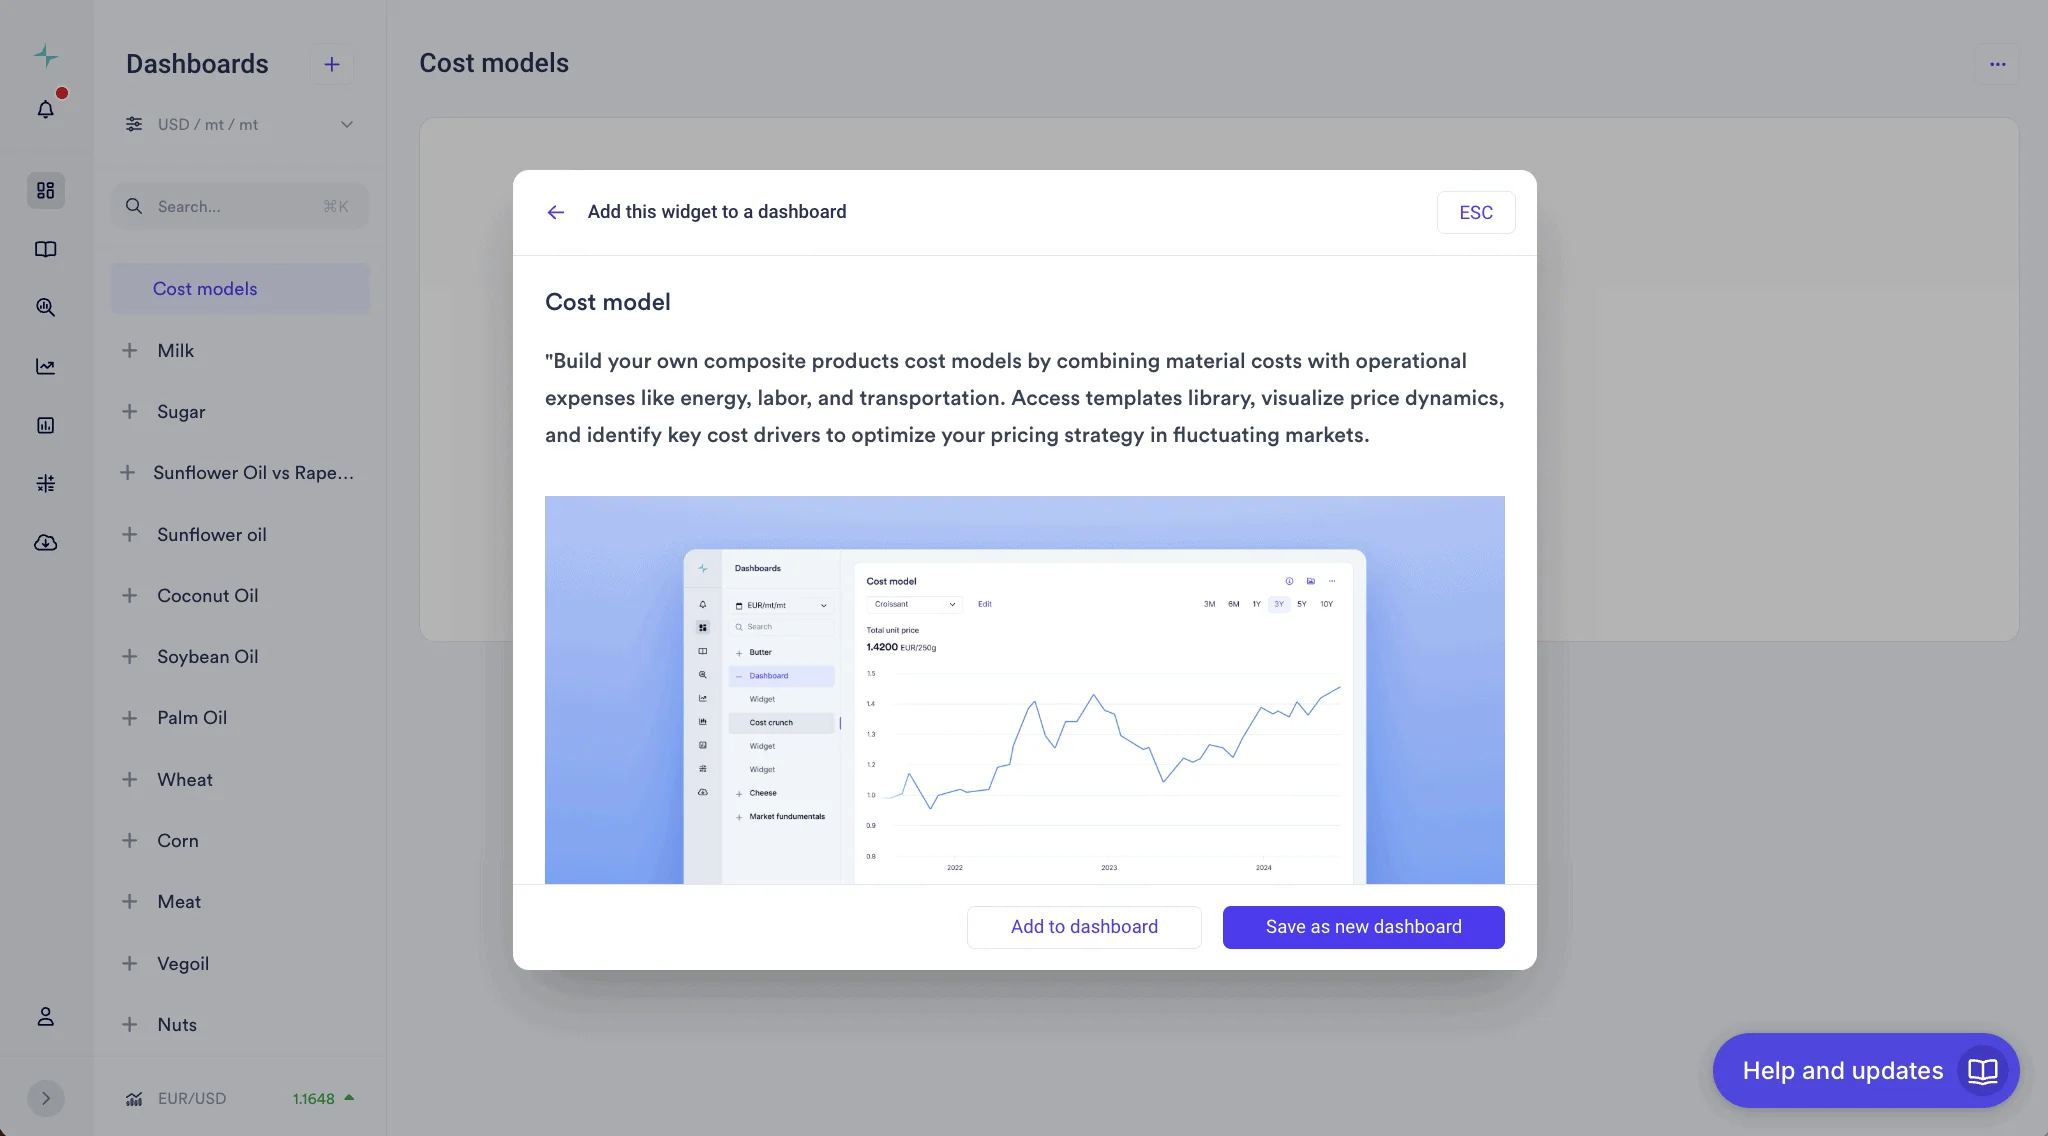
You’ll find Cost Models in your main search function. Simply search for “Cost Model” and you’ll see it appear with a “New Feature” badge. Click on it and you can add it to either a new dashboard or your existing one.
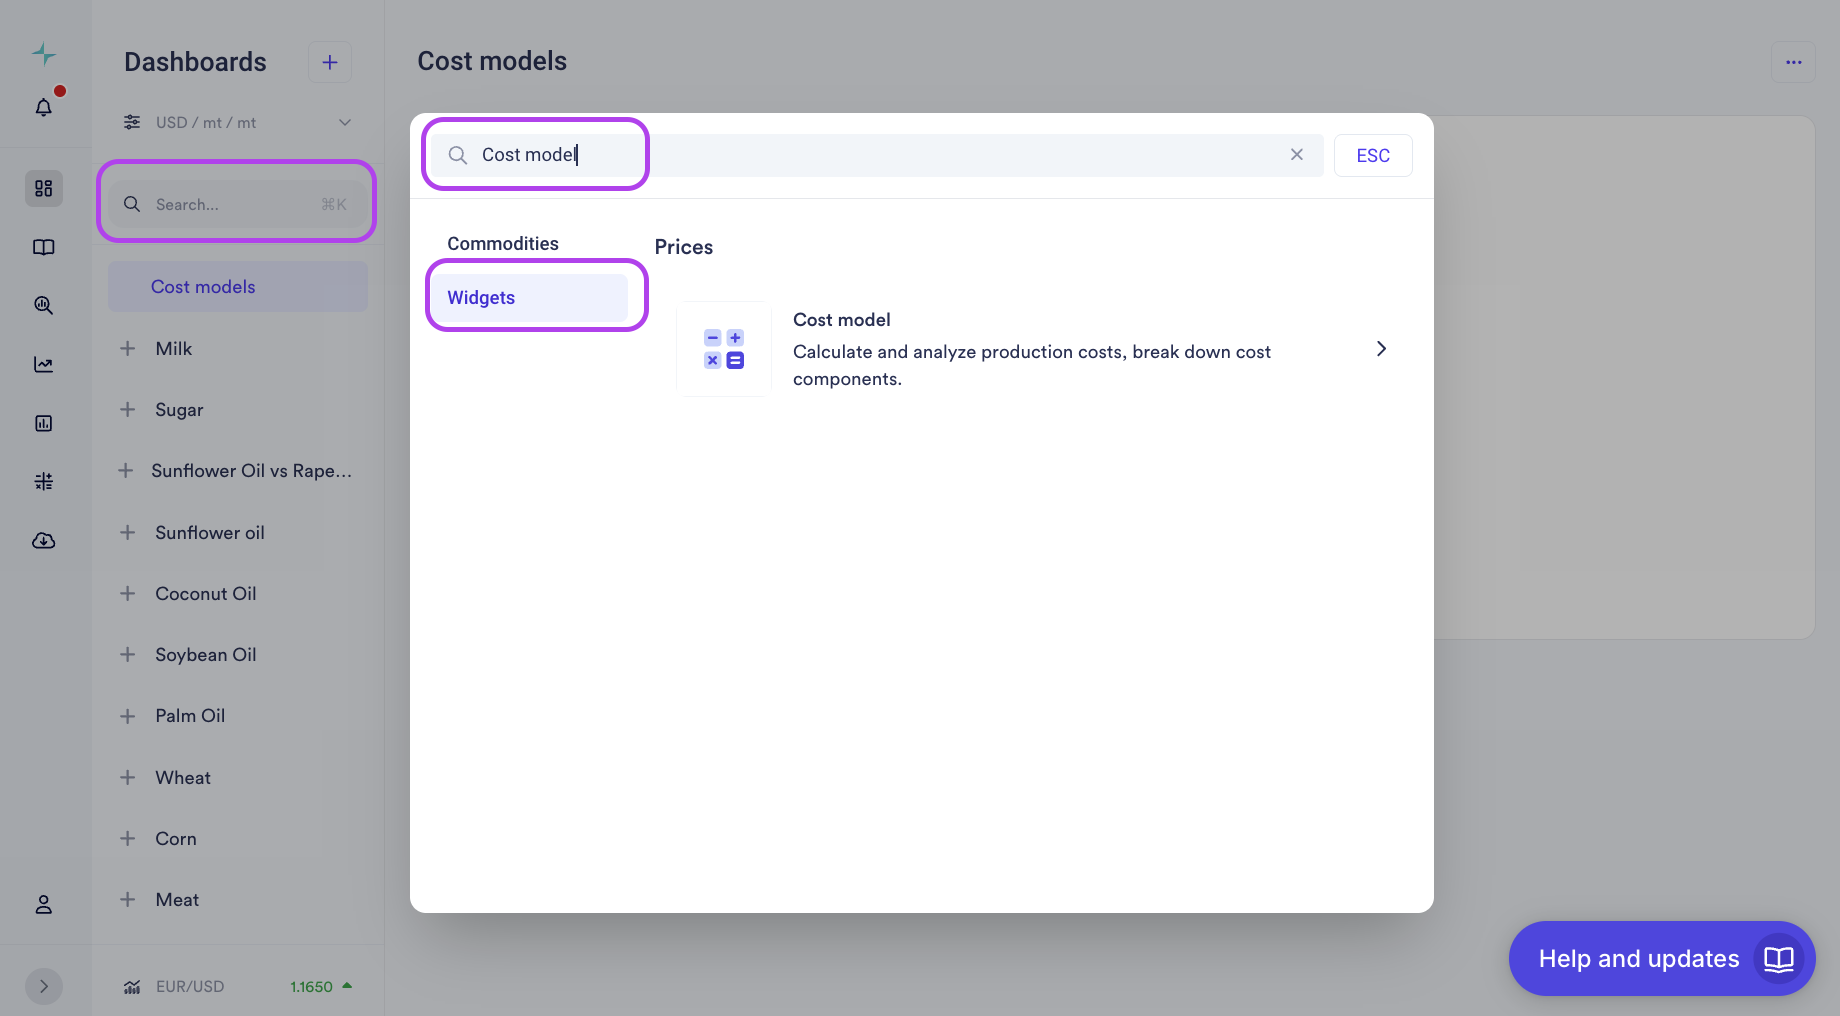
Once added, you’ll see the familiar Vesper widget structure with all the functionality you’re used to – time frame sliders, download options, and sharing capabilities.
Two ways to build your first cost model
Just like there are multiple routes to the same destination, Vesper offers two approaches to building cost models:
- Start with a pre-built template (fastest option)
- Build completely from scratch (maximum customization)
Let’s explore both methods using a bread cost model as our example.
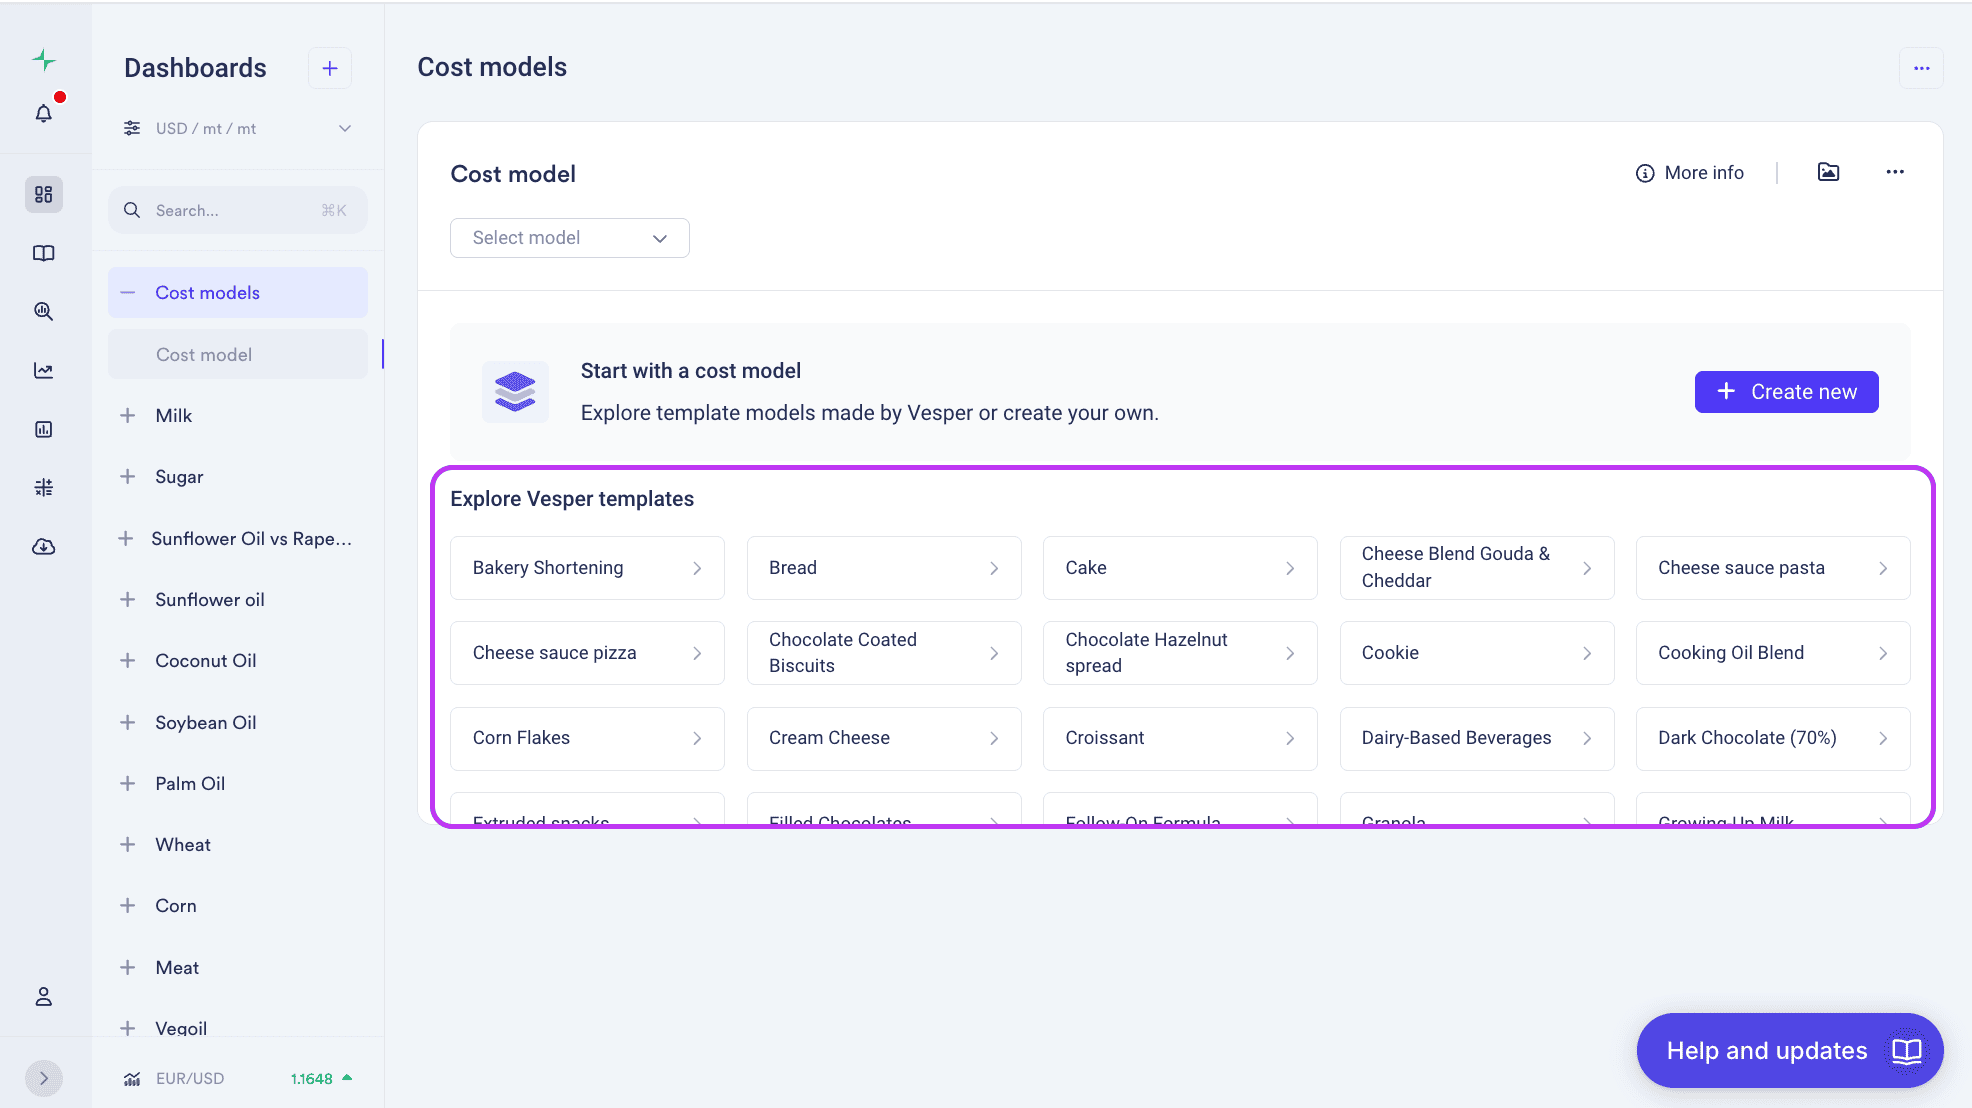
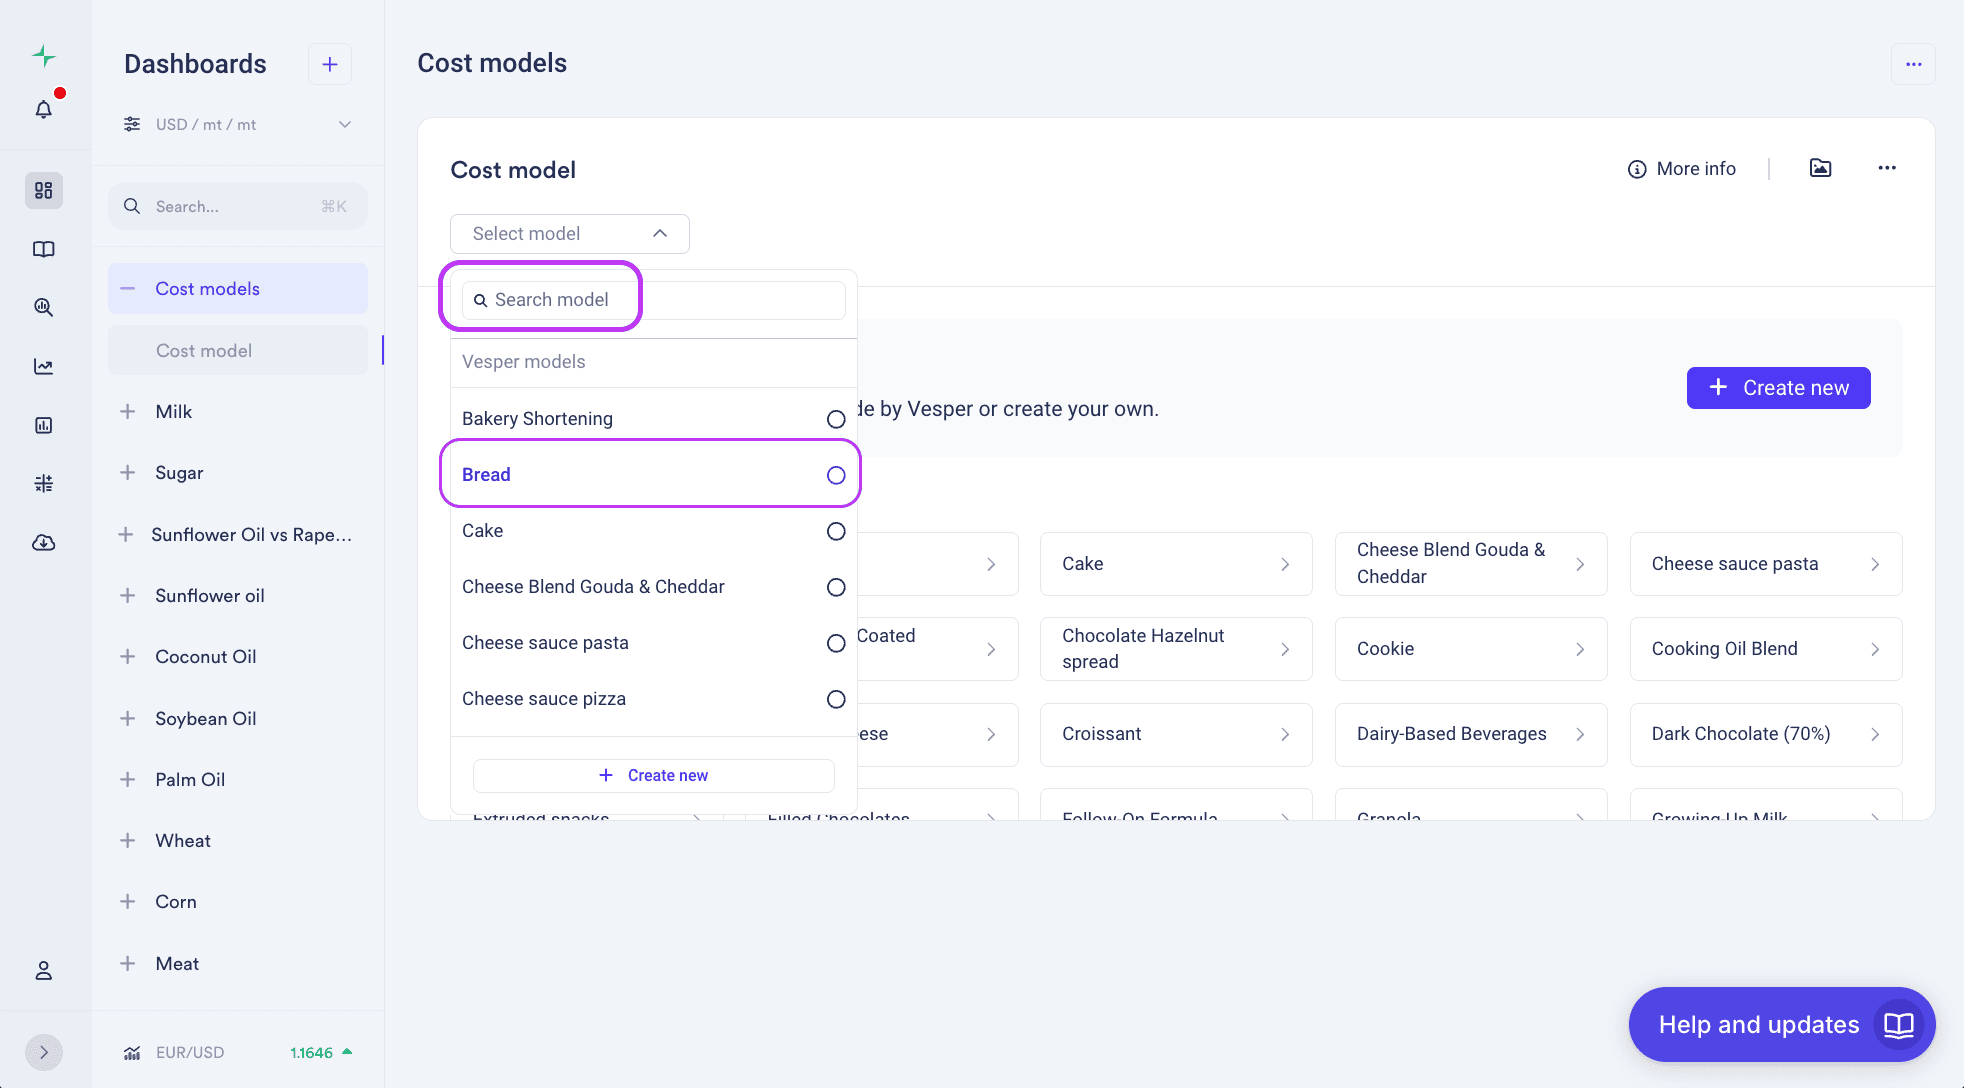
Method 1: Using pre-built templates
Step 1: Access template library
The quickest way to get started is with Vesper’s pre-built templates. You can access these in two ways:
- Click on one of the templates displayed below the main interface;
- Or use the “Select model” dropdown in the upper left corner and scroll all the way down to see all available templates
For our bread example, we’ll select the “Bread” template from the available options.
Step 2: Customize your template
Once you’ve selected the Bread template, click the “Edit” button in the top left corner.
Now you can customize several elements:
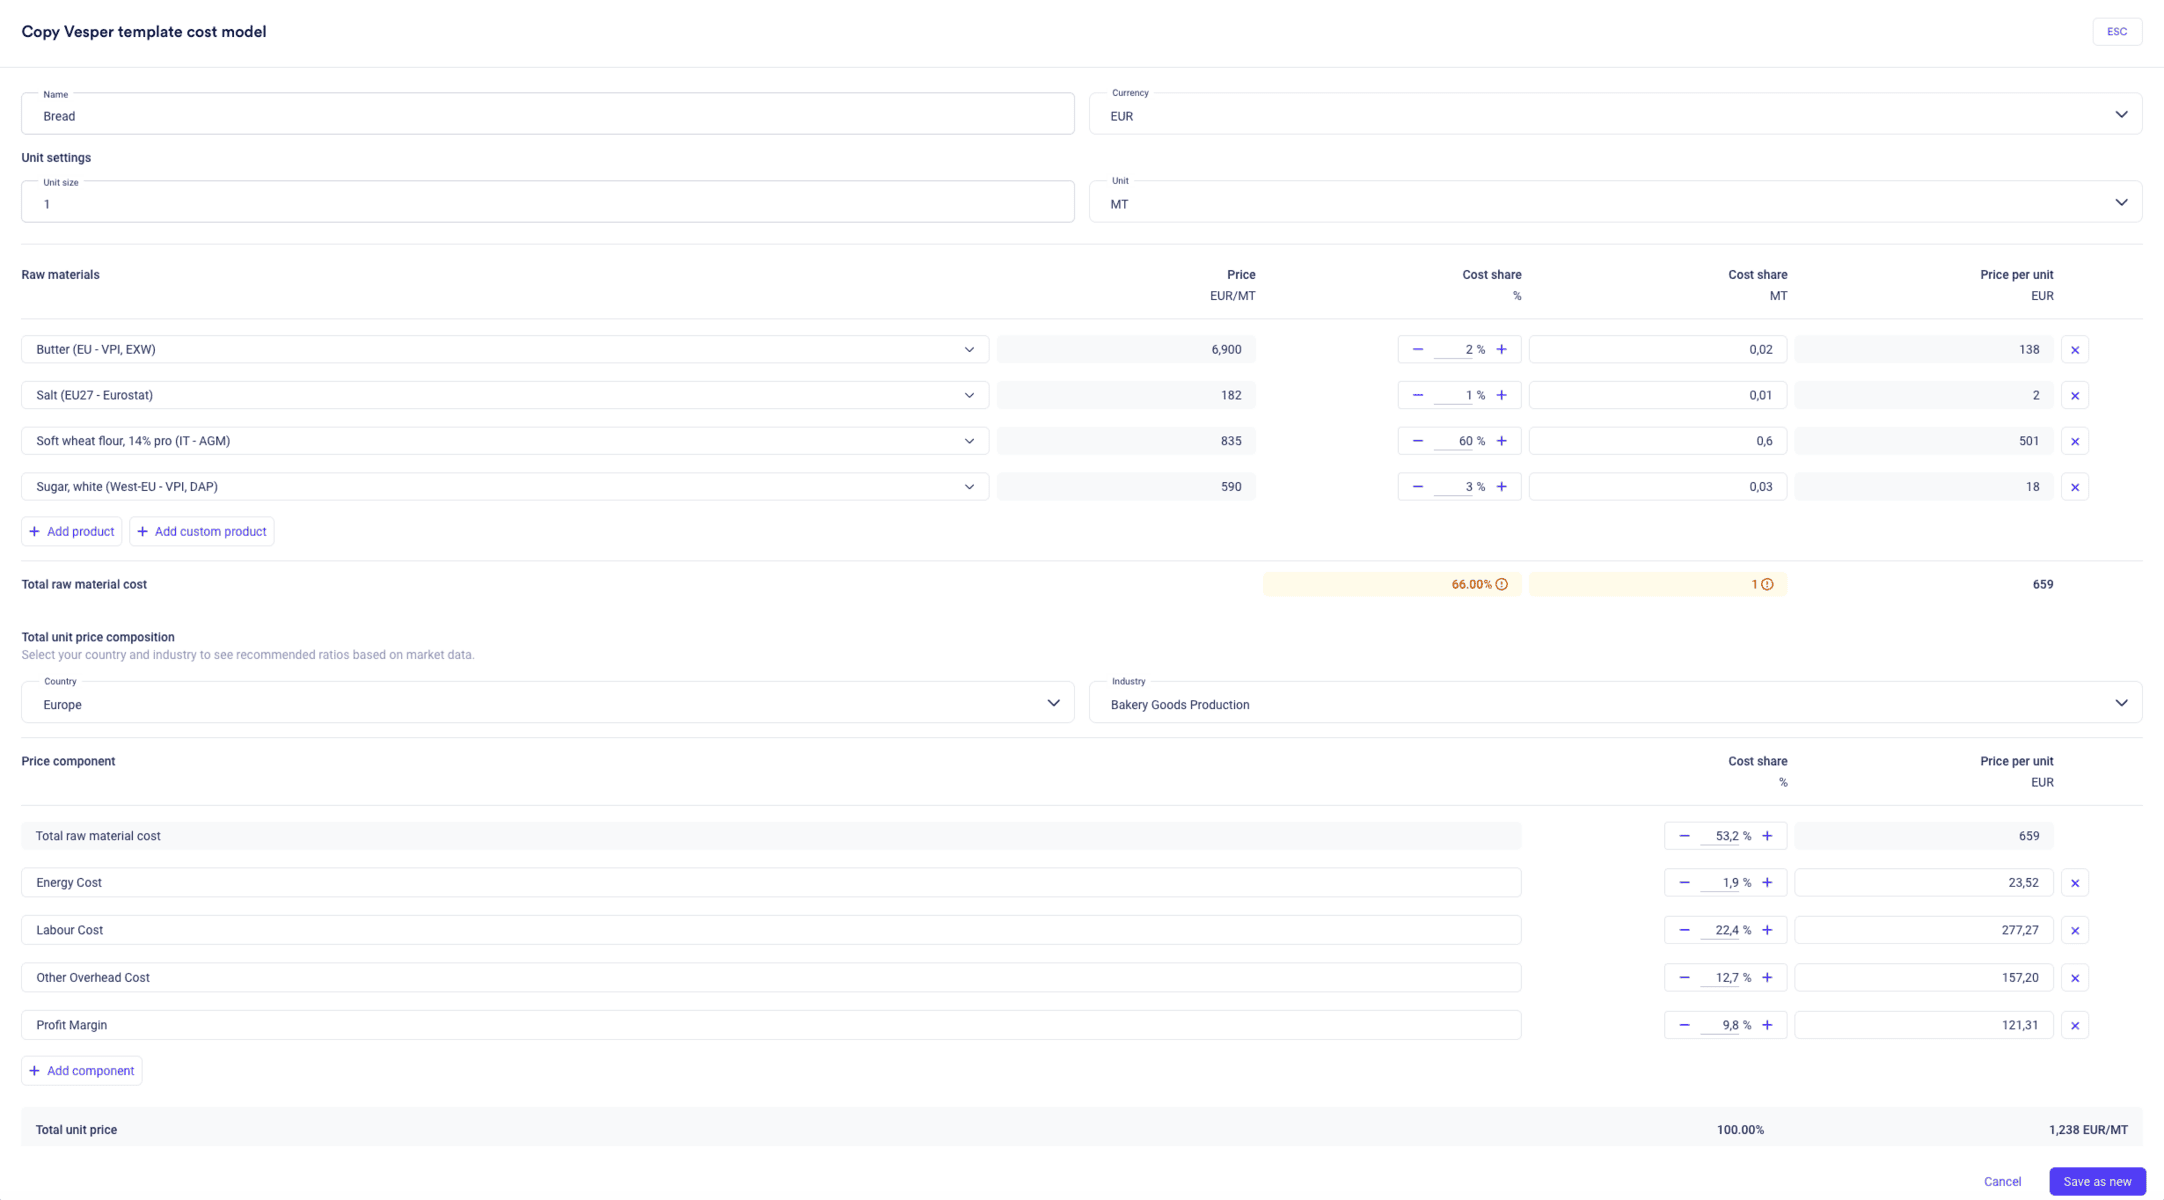
Unit settings:
- Unit size: Choose your preferred measurement (1 metric ton, 100kg, etc.)
- Currency: Select EUR, USD, or your preferred currency
Raw ingredients: The template comes pre-loaded with typical bread ingredients like:
- Wheat flour (60% of recipe)
- Butter (2% of recipe)
- Salt (1% of recipe)
- Sugar (3% of recipe)
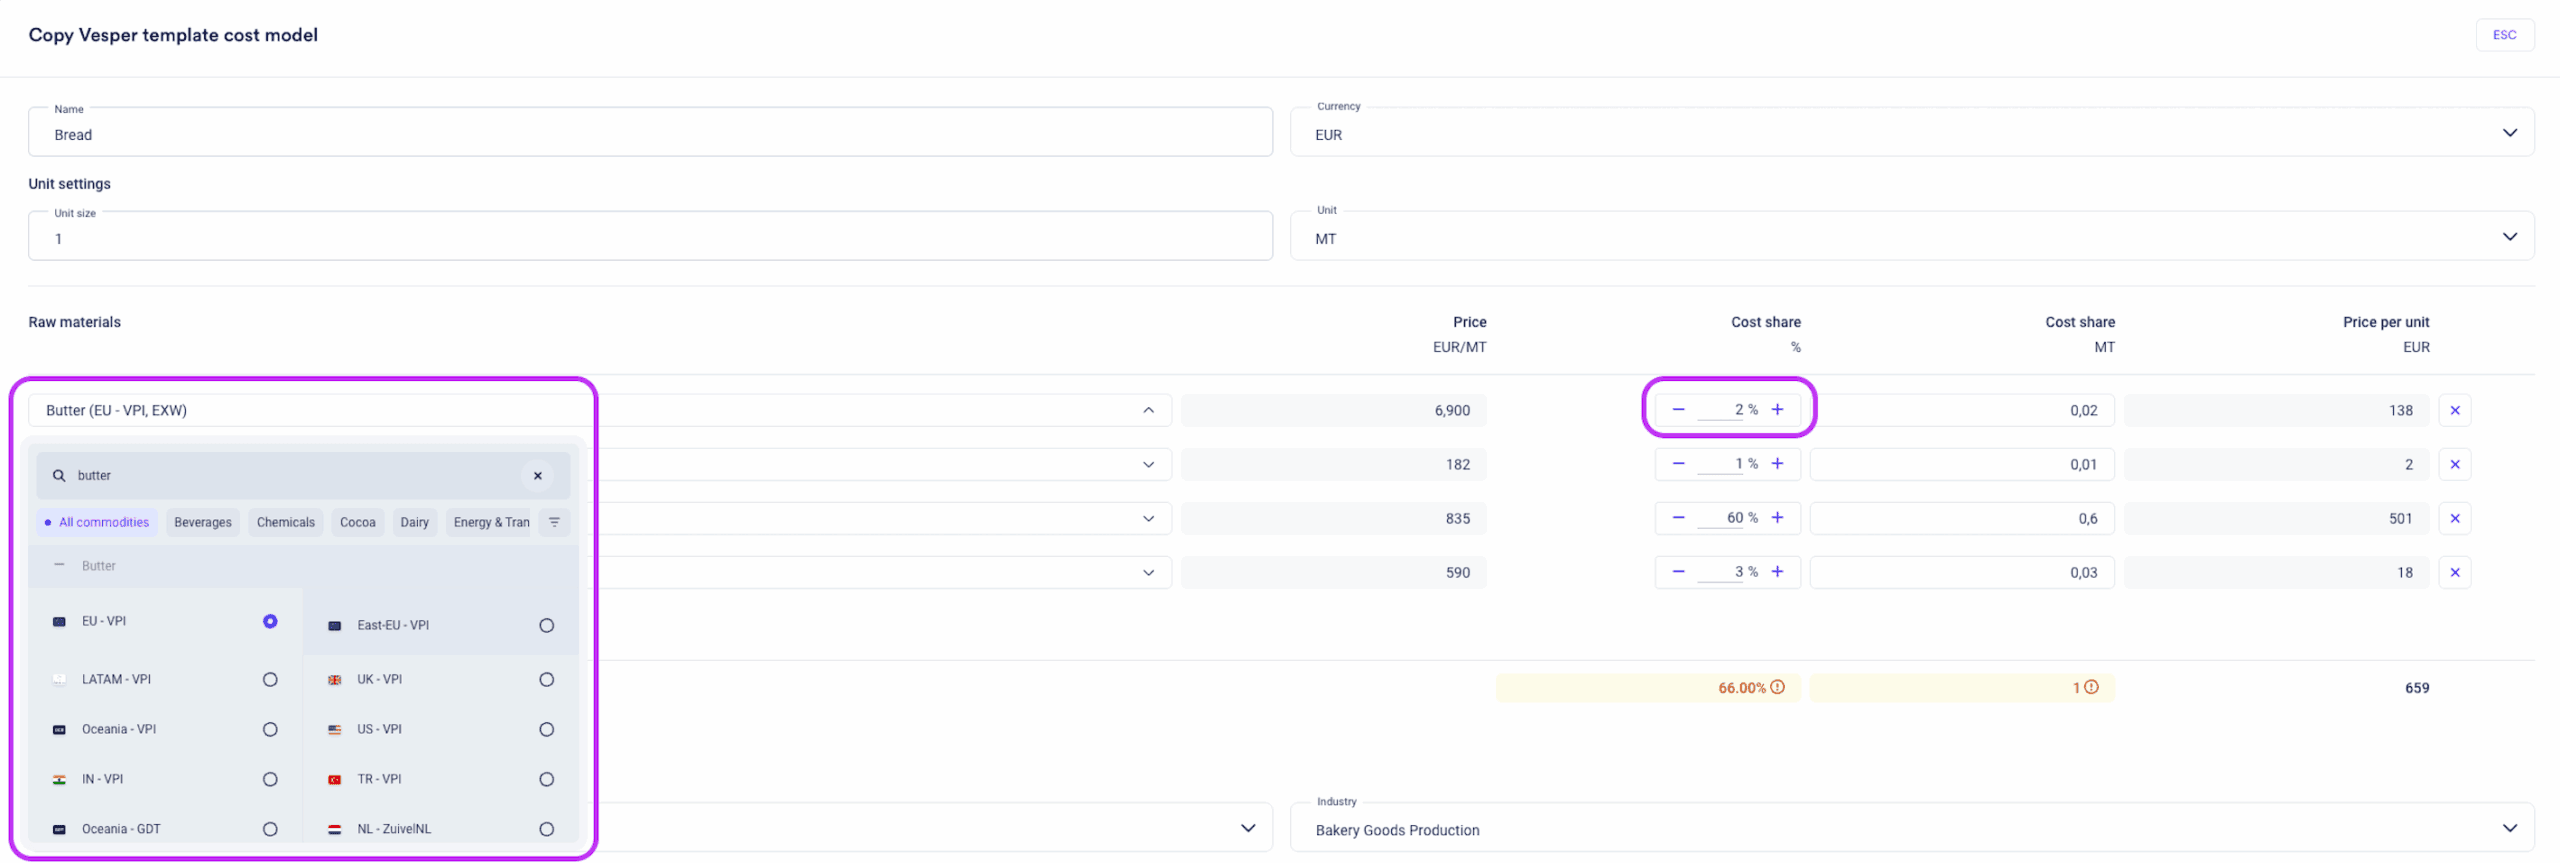
You can adjust these percentages or swap ingredients entirely. For example, if you want to change from European butter prices to Eastern European pricing, simply click on the ingredient dropdown and select your preferred price benchmark.
Non-ingredient costs: This is where the magic happens. Select your country and industry – in our case, “Europe” and “Bakery Goods Production.”
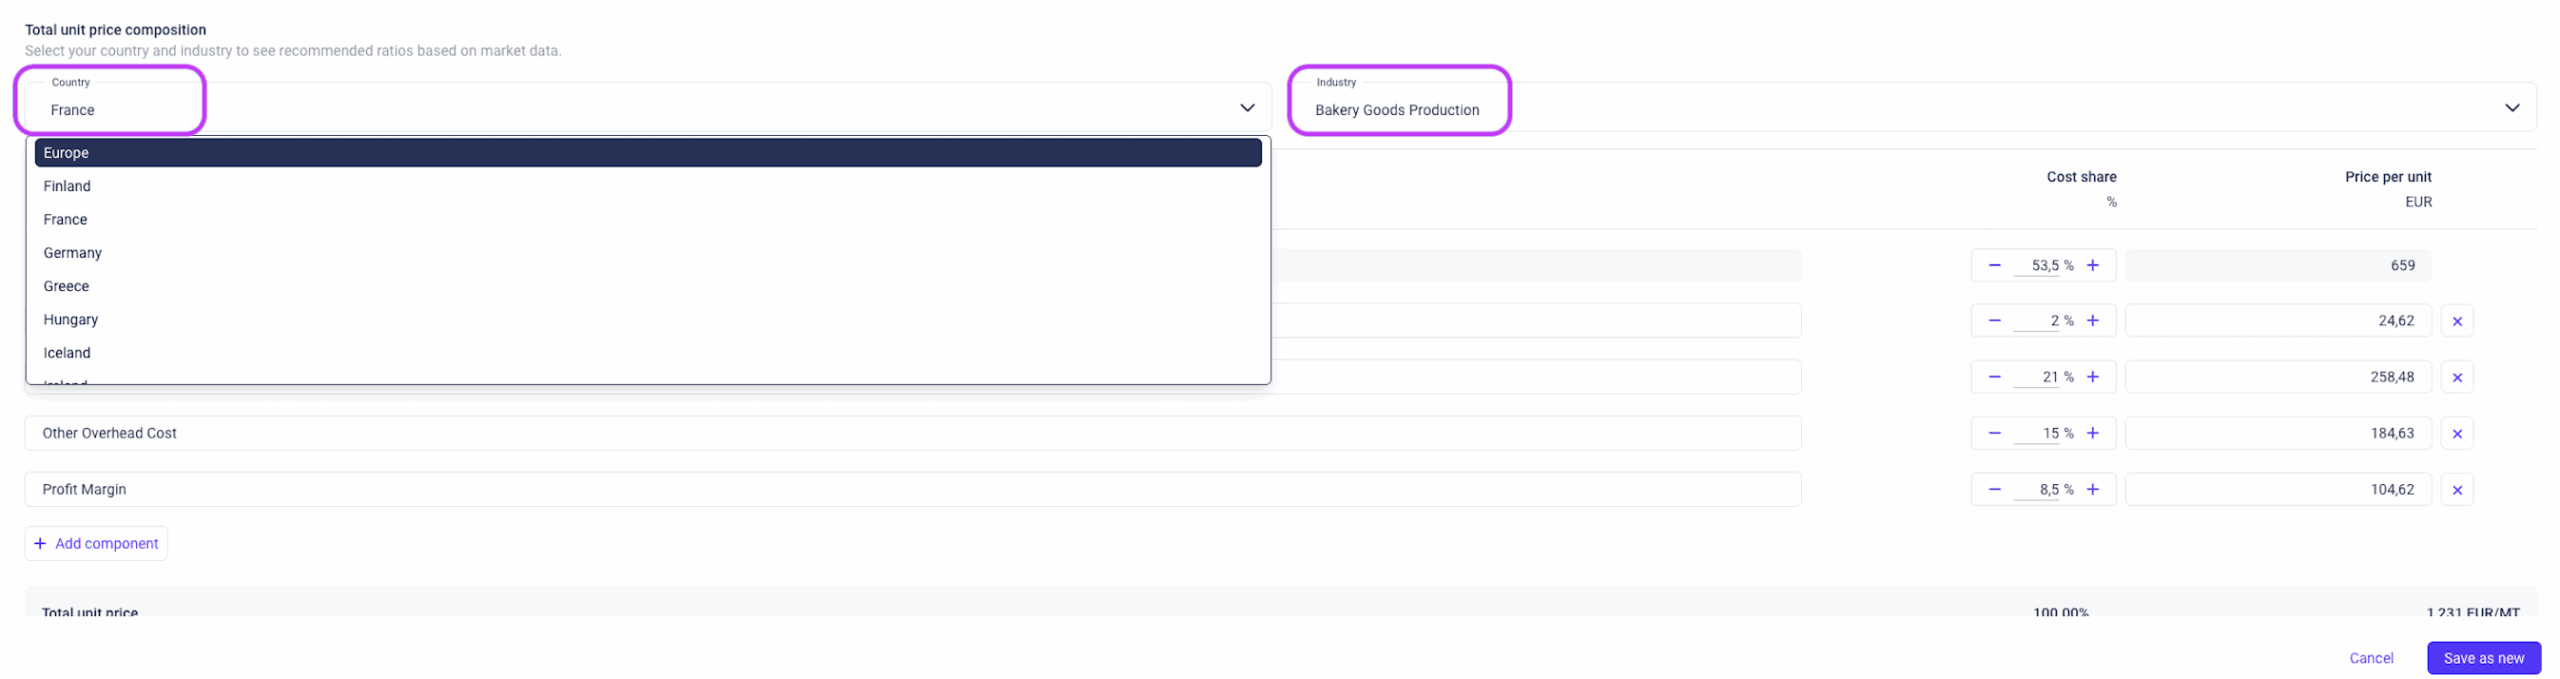
The system automatically populates industry-standard costs for:
- Labor costs: 22.4% of total product cost
- Energy costs: 1.9% of total product cost
- Overhead costs: 12.7% of total product cost
- Profit margin: 9.8% of total product cost
These percentages come from comprehensive industry data sourced by IBISWorld from national statistical offices across 36 European countries, including data from:
- France’s INSEE (National Institute of Statistics and Economic Studies)
- Germany’s Destatis (Federal Statistical Office)
- UK’s ONS (Office for National Statistics)
- Italy’s ISTAT (Italian National Institute of Statistics)
The data covers everything from repair and maintenance costs to telecommunications, R&D expenses, and temporary employee costs, giving you a complete picture of manufacturing expenses.
Step 3: Save your model
Give your model a descriptive name – let’s call it “Bread Recipe 1” and click the save button in the right corner.
Congratulations! You’ve just created your first cost model.
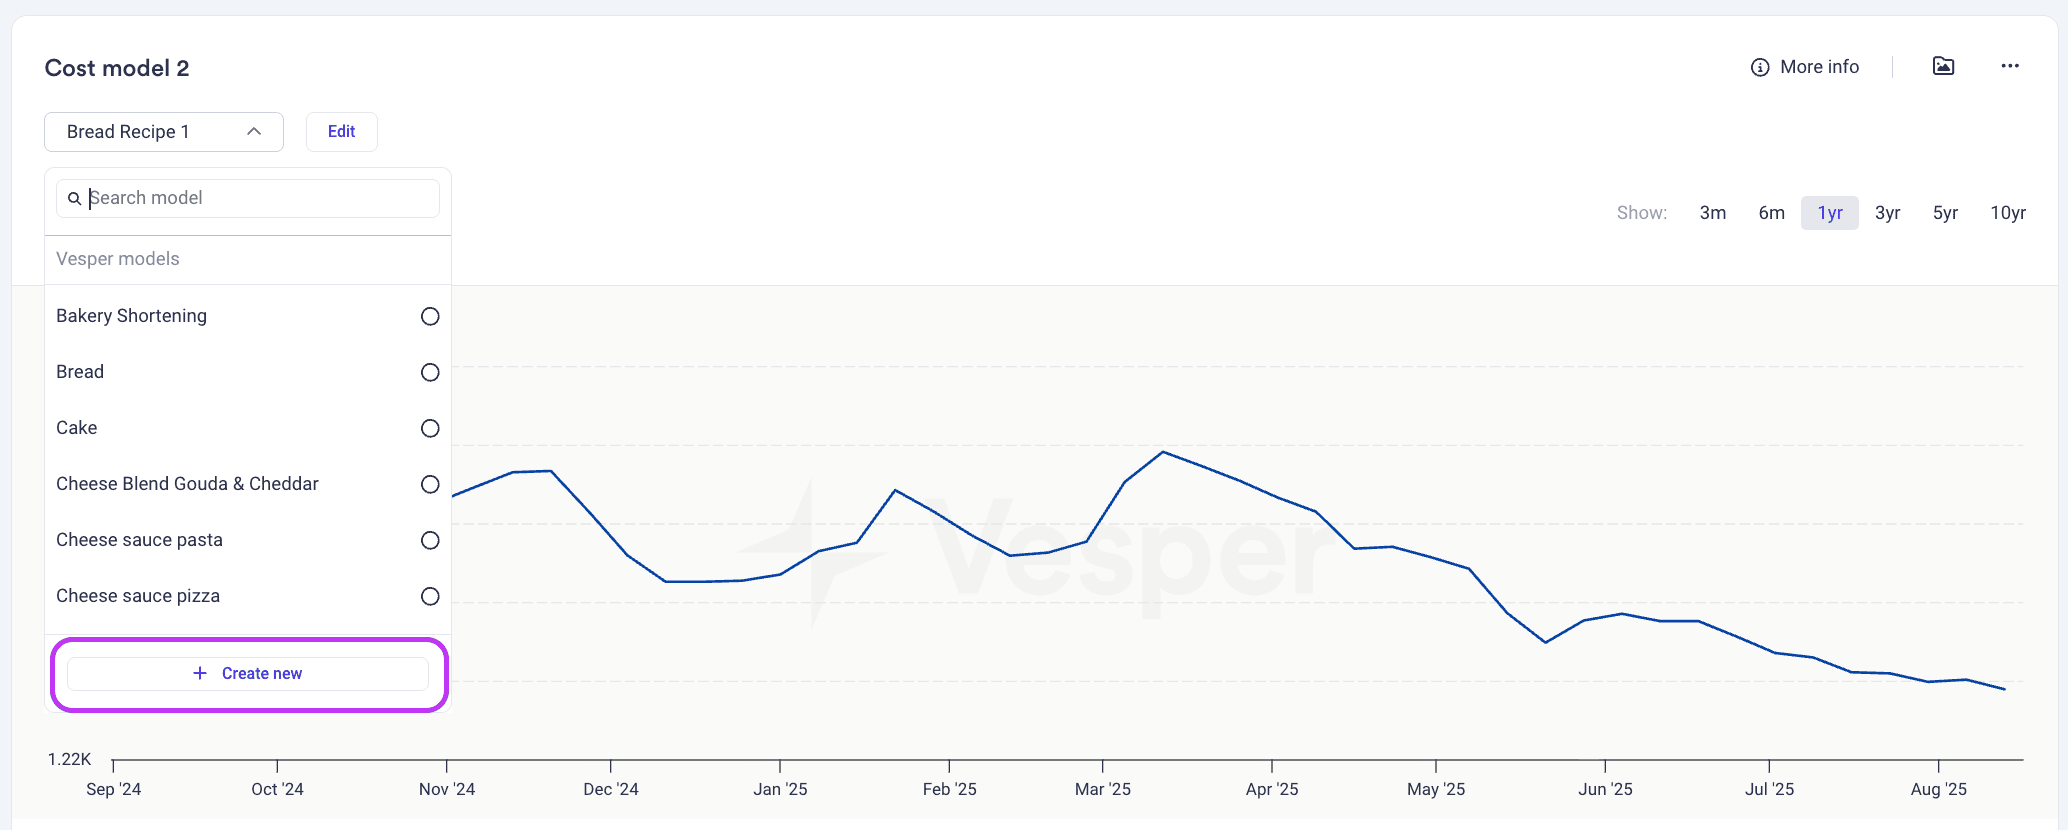
Method 2: Building from scratch
For maximum flexibility, you can build a completely custom model.
Step 1: Create new model
Click on the dropdown menu in the top left corner and select “Create new.”
Step 2: Configure basic settings
Set up your model parameters:
- Name: “Custom Bread Recipe”
- Unit size: 1000 kg
- Currency: EUR
Step 3: Add ingredients
Now comes the fun part – building your recipe:
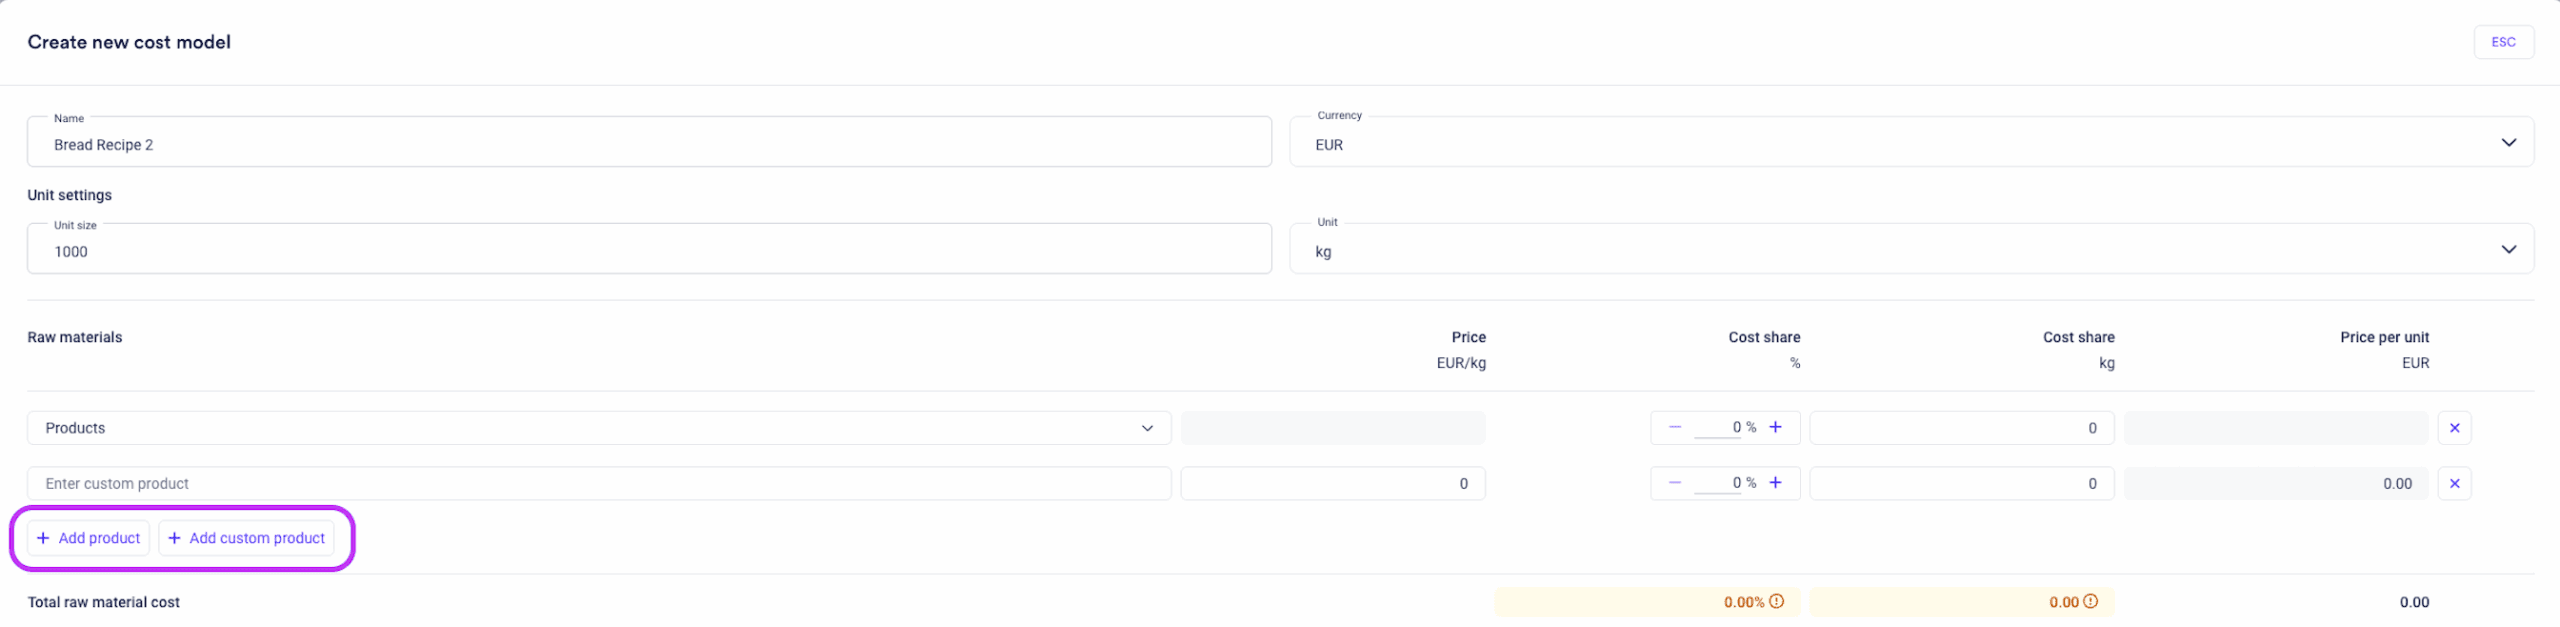
Add Vesper products: Click “Add product” to select from Vesper’s extensive price database. Search for “wheat flour” and you’ll see various options like “Soft wheat flour, 14% pro (EU – AGM)” with current pricing.
Add custom products: Click “Add custom product” to input your own pricing data. This is perfect when you have negotiated rates or quotes from specific suppliers that differ from market benchmarks.
For each ingredient, specify:
- Percentage of total recipe
- Weight in kg (automatically calculated)
- Cost per unit
Step 4: Configure non-ingredient costs
Just like with pre-built templates, select your country and industry to automatically populate manufacturing costs. The system draws from the same comprehensive database to give you accurate industry benchmarks.
Step 5: Save, export or duplicate
Save your model and choose your preferred export format: PNG, SVG, or JPEG. You can also duplicate your model by clicking on the three dots in the top right corner to compare multiple cost models in one overview.

Understanding your cost model results
Once your model is built, you’ll see a comprehensive breakdown showing:
Total unit price: The complete cost per unit (e.g., €1,238 per metric ton)
Cost composition split:
- Raw materials: 53.2% of total cost
- Non-ingredient costs: 46.8% of total cost
This split immediately shows you whether your product is more sensitive to commodity price fluctuations or manufacturing cost changes.
Advanced features and analysis
Time frame analysis
One of the most powerful features is the ability to analyze cost trends over time. You can:
- Adjust time frames: View data from 3 months up to 10 years
- Hover for details: See exact pricing on specific dates
- Track changes: Monitor year-over-year (YoY), month-over-month (MoM), and quarter-over-quarter (QoQ) changes
For example, you might see that your bread costs decreased by 1.27% year-over-year while energy costs increased by 17.99% – giving you precise insight into cost drivers.
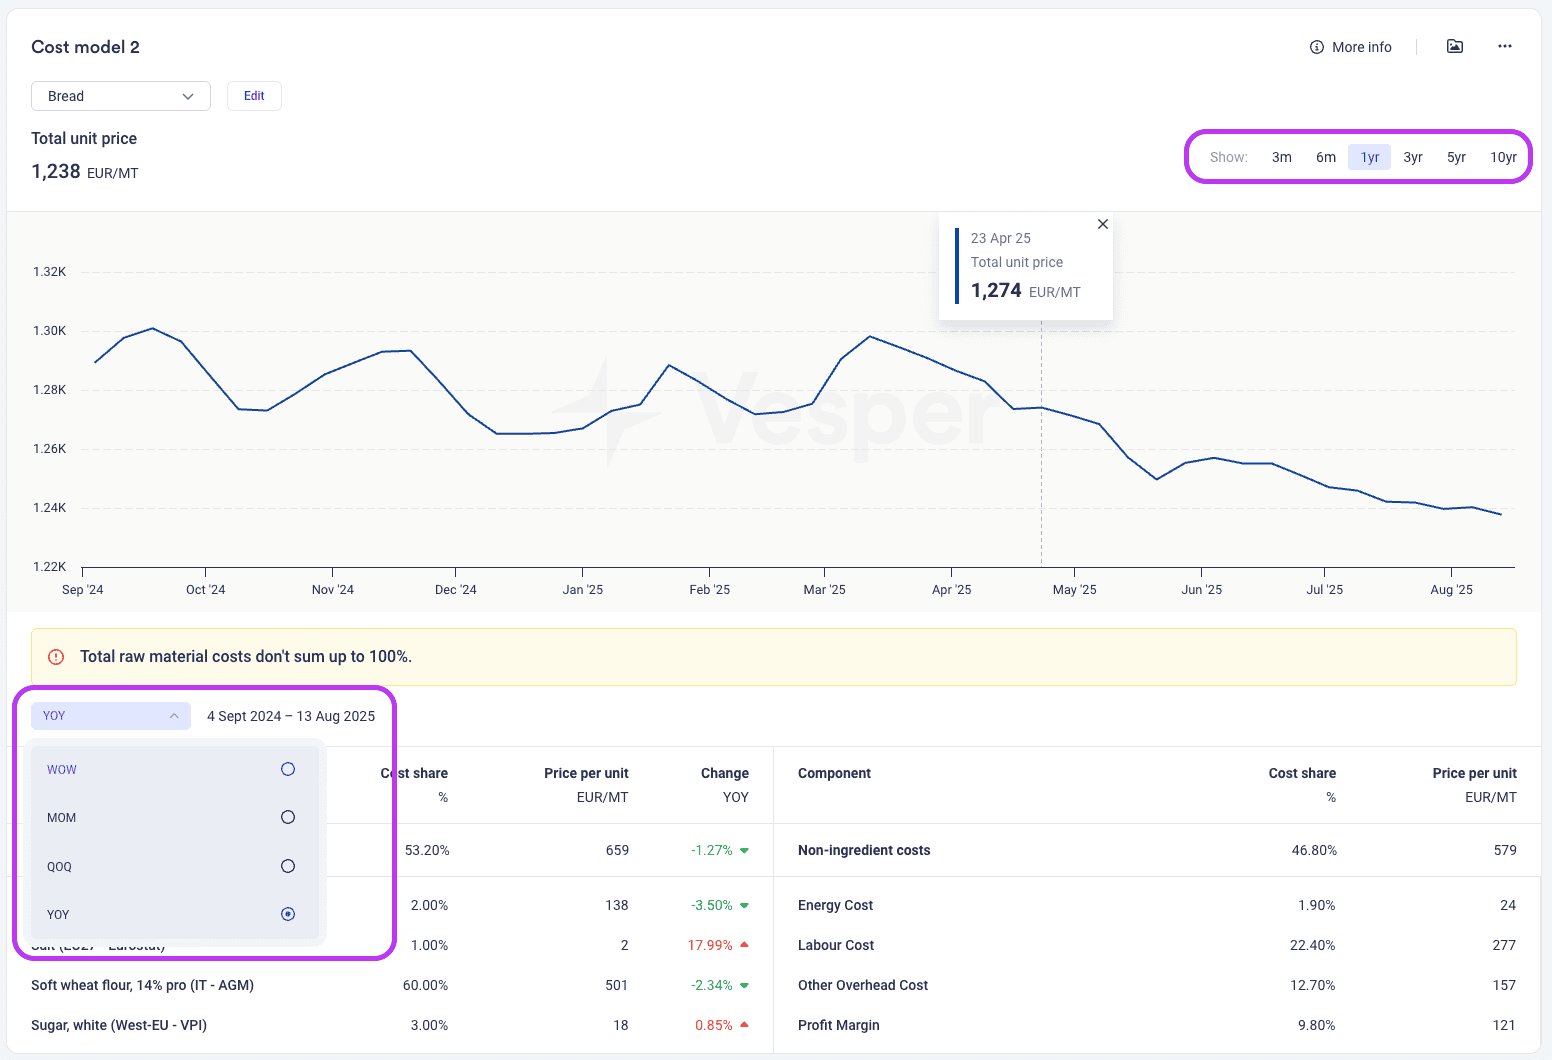
Component-level visibility
The detailed breakdown shows exactly how each ingredient impacts your total cost:
- Wheat flour (60%): €501 per unit, -2.34% change
- Butter (2%): €138 per unit, -3.50% change
- Sugar (3%): €18 per unit, +0.85% change
This granular view helps you identify which ingredients deserve the most attention in your procurement strategy.
Sharing and collaboration
Cost models can be easily shared with your team through:
- Direct exports in multiple formats
- Dashboard duplication to compare scenarios side-by-side
- API integration for automated updates to your existing systems
- Excel plugin for seamless data integration
Upcoming Enhancements
Vesper is continuously improving Cost Models with exciting updates available soon:
- Cost model forecasting: Project costs up to a year ahead by toggling from historical to forecast view
- Self-service model sharing: Users can share saved cost models directly with coworkers
- Fixed unit costs: Add fixed price values for non-ingredient costs to reflect real-world manufacturing contracts
- Enhanced UI/UX: Clearer separation of ingredient and non-ingredient costs for easier model creation
Why cost models matter for procurement
Cost models solve three critical challenges every procurement manager faces:
1. Setting realistic negotiation goals Instead of guessing what price increase is reasonable, you can see exactly how commodity movements should impact your products.
2. Negotiating with confidence
Enter negotiations armed with data-backed justification for your position, whether you’re buying or selling.
3. Justifying complex price movements When cocoa prices spike 120%, you can instantly show stakeholders the precise impact on your chocolate products, no more spreadsheet gymnastics required.
Getting started today
Building your first cost model takes less than 5 minutes with Vesper’s intuitive interface. Whether you start with a template or build from scratch, you’ll have actionable cost intelligence that transforms how you approach procurement decisions.
The key is to start simple – pick one product you buy regularly and build a basic model. As you get comfortable with the interface, you can create more sophisticated models and explore advanced features like scenario planning and origin optimization.
Remember, in today’s volatile commodity markets, having precise cost visibility is essential for staying competitive and making informed decisions that protect your margins.
Ready to build your first cost model? Log into your Vesper dashboard and give it a try.
Your future self will thank you.